All posts by Technomancer_Ral

Sanctum Upgrades: Resurrecting the CoLiDo DIY, Part 2

I’ve continued to have major issues with the printer, so I’ve been reading even more, and stocking up on new parts and tools so I can perform more intensive maintenance and upgrades on the 3D printer.

One of the issues that I’ve had is that sometime mid-print the printer will appear to lose track of where the carriages are located, and also appear to not register the end-stops.

End-Stop Replacement:

I finally branched out into soldering, and got a soldering setup and heat gun.

20200528_111246 

I’ve used this to replace all the end stops.  I cut the wires, and spliced new ones on, albeit clumsily.  There is an extra layer of heat shrink that I apparently thought was a good idea at the time, but I chose the wrong size.

20200421_132311

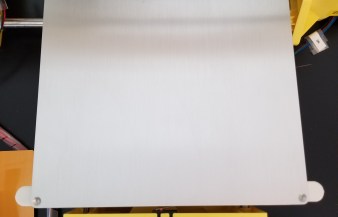
Build Plate Upgrade:

I decided to attach a metal build plate onto the printer, so that it would be smoother and more resilient than the standard plastic build plate.  I’m tired of having a plastic build plate that gets deeply scratched and deformed by a hot nozzle.  I think that having a metal bed will eliminate some of those issues, though it might cause more gear grinding issues if the printer loses it’s z-axis calibration again.

I had planned to do this by either 1) using binder clips to attach the plate or 2) use 3D printed mounts (along with some purchased screws, springs, and nuts).  I found that the binder clips that I bought were far too big for the printer, and also realized that I would need to make some gcode changes to account for their presence so that the nozzle wouldn’t run into them.   Even going with smaller clips would have had this issue.

20200528_114824

Photo of clips for illustrative purposes only

I also realized that the springs I had ordered were entirely too long (and possibly too stiff) to be used to mount the metal bed.  Maybe I’ll find a way to re-purpose these parts for another project later.

20200528_111209

So, I went with my default solution to problems.

Command strips.  I taped the plate to the plastic bed, and seems like it might work out alright.  I used the tape because with command strips, if it doesn’t work out you can easily remove them.  Down the line I’m wondering if I might need to replace them and add some sort of supports underneath the plate so it is even less likely to flex (it’s only supported in those 4 corners).

20200413_180932

Filament Spool Issues:

A separate issue I have is that loading and unloading filaments of different types was a pain.  The original spool holder that came with the printer requires disassembling and reassembling the holder around the spool every time I want to change filament.

20200528_113242

Also, from the angle the filament travels there is clearly a lot of friction over time.  The feed hole was originally round.

20200528_113303

I’m not sure whether this filament drag was contributing to some of the issues with the print head moving in unexpected ways, so I tried out adding an easier-to-use spool mount on top of the printer.

20200528_111306

The large parts are 3D printed, but it also uses 2 skateboard bearings.  I didn’t design this one, I found it on Thingiverse here:

Printrite horizontal spool holder

I figured that it would make loading and unloading filament much easier, and the different position plus the bearings would reduce any drag caused by the angles the filament had been travelling through.

Sadly, I’ve found that the spool will occasionally fall off the top of the printer when I try to use the new holder, and with a heavy spool that is too much of a risk of damage to the rest of the printer, so I’ve had to stop using it.  I may end up trying the version with the steps on it, in the hopes that the steps will keep the spools from falling.

I also designed and test printed a spool holder design of my own, but that ended up being it’s own separate set of issues.

Note:  This post is a case in point of why logging/blogging can be good for your hobbies.  You look at what you’ve done, what your problems were/are, and re-evaluate while you write.  I’m catching up on this a few weeks later, and I had forgotten that there was a stepped version of the spool holder that I can try.

To be continued…

Sanctum Upgrades: Pencil Cups

This is actually two items, but they are similar enough I felt I should lump them together.  I got tired of finding writing utensils everywhere in my living room (I’ve been working out of there a lot while my desktop computer was down).  I also got tired of having to dig around in the top of my toolbox for my 3D printing spatulas.

As a 3D printing guy… when you have a hammer, everything looks like a nail.  Or in this case, I’m not gonna buy a pencil cup when I have a 3d printer, time, and excess material lying around anyway.

I printed a pencil cup for the pencils and pens, and modified a dice tower model into a tool holder/pencil cup for the spatulas.  I figured I wanted something thematically appropriate for such items in my sanctum.

20200504_004144 (1).jpg 20200504_004023 (1).jpg

If you want to make your own, you can find the models here:

Dodecahedron Cup (by Jayrobox)

Cyberpunk Tool/Pen/Pencil Cup (a remix by me)

In case you are wondering how that obviously top-heavy tool holder is staying up, I used a bit of tacky to secure it to the work bench.  This stuff:

20200506_005714.jpg

It’s some stuff I originally bought to hold items in place for painting, but it is useful for securing things in general.  As a kid I remember using a blue version of this for posters and craft projects.

Sanctum Upgrades: Resurrecting the CoLiDo DIY, Part 1

I decided, what with all this extra time at home, that I’d reassemble my old CoLido DIY 3D printer and increase my range of capabilities and throughput.

Self Education:

I’ve been working on educating myself more on FDM 3D printing, so I’ll have a better background for diagnosing issues and fixing problems.  Here’s my reading list so far:

3D Printing 101

This book has some useful info I hadn’t considered, but needs a trip to the editor for readability.

20200516_145647

3D Printing Failures: 

This book has a lot of useful information, minor editing/clarity issues, but is definitely based on a lot of experience and has helped me to better build my list of setting checks, maintenance items, and tests to run.

20200516_145642

3D Printing 101 video series.

This series is on the Maker’s Muse channel on Youtube.  I haven’t made it all the way through yet, but I plan on running it in the background a lot to try to absorb more information while making progress on this and other projects.

3D Printing 101 By Maker’s Muse


Early Work:

I’ve updated Octoprint to run multiple instances so I can control both printers from the same Raspberry Pi.  Here are the links I’ve used so far for it.  It doesn’t work perfectly, but at least it works for now.

Setting up Octoprint for Multiple Printers

Multiple Printers and Octoprint

I still want to get it set up with the Wyze camera, but so far no joy.  Here’s a link to some of the materials I’ve seen compiled on the subject so far.

Octoprint and Wyze camera

I’ve been tweaking and updating the CoLiDo’s settings within Simplify3D for better print quality.

Bed levelling went pretty well.  I ran a Calicat (calibration model) and a temperature tower, which both showed significant issues.

20200330_222827

20200318_222232

I recalibrated the e-steps, and reprinted the temperature tower.  This showed little if any improvement.

I cleaned the extruder gear and radiator with canned air, but that didn’t seem to have much impact.

I also lubricated all the rods and pulleys, tightened the belts, and tightened all the screws on the printer.

And I still had issues.

To be continued…


Sanctum Upgrades: Remote Control

This one is really straightforward.  I kept losing track of my remote control.  A little bit of velcro command strip on the wall, and a strip on the back of the remote, and I had a standard place to put it back… but even then I still often forgot to put it back.  I finally decided to turn the remote sideways, adding some more command strips to the wall to support that.  From this position, It’s pointed at the tv and can be used while on the wall.  The second remote I happened to find while going through old electronics, and realized it still worked to control the blu-ray player, so I added it as well (better functionality and I don’t forget to switch which device is controlled).

Sanctum Upgrades: PPE Wall

I’m trying something new.  I thought I’d start breaking down some of the updates that clutter my other posts, particularly in the realm of trying to make my sanctum work better for me.  Maybe these will give you guys some ideas of how to customize your sanctums for the way you work.

This week’s upgrade: my Personal Protective Equipment (PPE) wall.

20200504_004051

Starting simply, I was fed up with the way I had my gear stored at/on my workbench.  Several items kept ending up on the bench or in my toolbox, which gets in the way.  I went to my old favorite for problem solving around here:  command strips.  I found a section of wall I wasn’t using for anything, added some command hooks for several items, and 3D printed a modified version of a mount for safety glasses.  I mounted everything with command strips, spacing everything out to be accessible.

Potential enhancements:  I still need a spot for my welding goggles and box of disposable gloves.  I haven’t figured out where or how I want to mount those yet.

Keytar Paintjob

I finally got around to sanding and repainting the keytar.  Here’s what the case was like beforehand.  Some parts were rather scratched up during my last attempt.  Particularly near the neck.

FB_IMG_1588466206718.jpg

I sanded it 4 times, once each with 200, 400, 800, and 1000 grit sandpaper.  That took a while, but I got through a few episodes of Babylon 5, so it’s all good.

20200501_150533.jpg

The next day I drydusted the case, wiped the whole thing down with alcohol to remove the rest of the dust, and spraypainted.

20200502_202952.jpg

It seems to have come out much smoother!  My only gripe is that I forgot to cover the rubber feet, so I’m going to need to sand off that paint and cover them with painter’s tape again before the clear coat layers.

Next steps:  Rub’n Buff on the greeblies and stickering the back of the case.

20200503_205407.jpg

I thought I’d make the greeblie accents pop a bit with some pewter contrast.  I need to do a bit of research and planning to decide exactly what I want to accent and how I need to do it.

Here’s what I’ve got in mind for the sticker arrangement at the moment.

20200503_030930.jpg

I’ve debated a couple of other stickers, but I think they might cause some problems:

20200503_015246 20200503_015241

I also feel like it needs one or two other stickers, but I haven’t found what I think is appropriate.


Miscellaneous items:

Yeah, I know I haven’t been writing in a while.  The RAM in my desktop went bad a few weeks ago, and I’ve been forced to operate from my laptop in the meantime, which is NOT convenient for getting a lot done, as I had picked it up as something super-portable for just checking email and such on trips.  The replacement RAM finally showed up, and I appear to be back in business!

I’ve been working on things around the house a lot, so hopefully I should have more content for here soon.  Being stuck at home a lot, I’ve been making a lot of tweaks and expanding my hobbies.

PAX East Shoutouts

I went to PAX East this year, and I thought I’d go over some of the things I’ve come across.


Wild Bill’s Soda:

These guys seemed pretty popular, and I saw two stands from them.  You buy a tankard from them, and you get free refills of their drinks for the day.  You can bring the tankard back on a different day or a different event, and pay for another tag for a day of free refills.

20200308_212603.jpg

www.wildbillssoda.com

Graffiti Games:

These guys were demoing a couple of their games, the one that grabbed my attention being Cyber Hook, where you play as a decker navigating past obstacles in the matrix.  It caught my eye mostly from the aesthetic, didn’t see enough of the game to know whether there is much story to provide staying power.  It’s supposed to come out in Q2 2020, so I’ll keep an eye out for it.

(Btw, if you guys are reading this, you should remember to include your url on your handouts)

www.graffitigames.com

Rainway:

I was looking for the badge-in portals that PAX East had for achievements, and found one at this booth.  This particular one spins a virtual slot machine, and I ended up winning a tiny flashlight.

20200308_212529

Anyway, Rainway appears to be a system that allows you to access your games that are on your PC on any device you own, anywhere.  I’d think there’s likely a lag problem, but I haven’t gotten around to testing that.  Seems to be a neat concept, anyway.

https://rainway.com

CritSuccess:

These guys make spinny dice rings, where you spin the outer section of the ring and get a  result.  I’ve heard of them for a while, and finally decided to get d20 ring, just to amuse myself.

20200308_212355.jpg

20200409_155358.jpg

www.CritSuccess.com

Norse Foundry:

These guys make a lot of dice, minis, and game accessories.  I ended up picking up one thing I found interesting.  They made a game map compass rose that you place on the map to define the orientation of the map.  I know you can just draw an arrow and write an N next to it, but the coin looks cooler.

20200409_155510.jpg

20200409_155513.jpg

www.NorseFoundry.com

Elderwood Academy:

These guys are known for dice towers and dice boxes.  I didn’t pick up anything here since it doesn’t fit my particular needs at the moment.  They make some really cool stuff, though.

www.elderwoodacademy.com

Ayopa Games:

These guys gave me a free product code for a game called Dungeon Crawlers on Steam.  Don’t know much about it yet, but eh, free game.

(Again, people need to list their URLs on their handouts)

Prints by the Bard:

This guy was our DM for organized play.  Apparently he also does 3D printing himself, resin printing in his case, and shared his card.

And I totally called that a slime was hiding in the rubble.  Too bad I didn’t roll high enough on initiative, and could only watch in horror as it came out.  Oh well, Drocan Disorderly was able to fight them off with a torch (didn’t want to damage my heirloom weapon).

www.printsbythebard.com

Geekify:

These guys make a lot of cool custom stuff for people.  I didn’t get any of their samples (I’m a bit skittish of carrying around a summoning scroll for Cthulhu, and the other scrolls weren’t from my particular fandoms), but they make really cool stuff.

geekifyinc.com

Chessex:

If you are a tabletop gamer who goes to cons, you probably already know these guys.  You’ve just gotta stop by and look at their assortment of dice.  I picked up a few this time.

20200409_155536.jpg

www.chessex.com

Arenanet:

They had a Guild Wars 2 booth.  Also, got a code for a free in-game outfit.  Yay.

www.guildwars2.com

Spaceteam VR:

I’ve played the regular app, and I’ve seen that there is a card game.  You are on a spaceship that is constantly in peril and blowing up.  And you receive instructions… for everyone else’s consoles!  You have to yell and listen for instructions to cooperatively survive all the disasters befalling your ship.  Asteroids, wormholes, slime, shorting panels, etc.  It’s awesome.

Now… VR is in the works!  Some of my friends tested it out, and it was hilarious!  I still think it was extremely satisfying that the devs were confused at how one of my friends was doubling the highest previous score.

“Oh, didn’t you know?  He’s an aerospace engineer.”
“WHAAAT?”

spaceteamvr.com

Megacat Studios:

These guys make new games for old consoles, complete with custom cartridges that fit in the old consoles.  I’m gonna have to keep an eye on these guys for some possible collab.

www.megacatstudios.com

Dice Dungeons:

This group is where I got my D&D character coins from.  They had a booth, and while I was looking I saw that they had some cloth maps.  I decided to pick up their tavern battlemap.  I think if I start DMing homebrew again I’ll just have to make taverns a franchise business to explain the common layout!

20200308_212250.jpg

I also found a deck of quest notices.  This will definitely help when I need to populate a quest board at the adventurer’s guild in homebrew!

20200308_212330.jpg

www.dicedungeons.com

Widget Ridge:

This is a steampunk deckbuilding game of some kind.  It looked somewhat interesting at a glance, but I haven’t really looked too much into it yet.

https://www.widgetridge.com/

Greater Than Games:

I meant to spend more time at this booth, but we never timed it out right.  These guys make the game Kill Doctor Lucky, a sort of inverse version of Clue.  Instead of trying to find out who murdered Mr. Boddy, you are trying to kill Dr. Lucky without being seen by the other characters.

(I’d include a link, but this one is flagged as a security risk by my antivirus, so I won’t).

Acq Inc. Documancer:

I didn’t catch her name, but there was a lady dressed as a documancer from Acquisitions Incorporated who had an awesome wooden backpack filled with all the essentials for documancy.  Prewritten contracts, paper, quills, ink, etc.  She gave me a contract for intern employment at Acquisitions Incorporated.  I’m still periodically checking to make sure I didn’t accept the terms by touching the contract.  You never can be too careful with those guys!

20200308_212407.jpg

Miscellaneous:

There were a few other purchases where I forgot to grab business cards, but here is some stuff I picked up.

Crystal caste style dice, for my fireballs and healing potions.  I can never seem to find these online.

20200409_155559.jpg

Obligatory set of new dice.  I liked the Tolkienien script on parchment style of these.

20200409_155612.jpg

Dice bag for all the dice:

20200409_155622.jpg

From the Desperados 3 demo booth:

20200308_212451.jpg

My friend and I demoed the game “Who’s Your Daddy,” and won a shirt.

20200409_161745.jpg


Educational Games

With all these people (and especially kids) having to stay home due to you-know-what, I thought I’d make a list of games with educational value to occupy their time.

The list is short for now, as this isn’t something I usually look up, but I’ll try to keep adding things to this post as I keep looking around a bit every so often.  You can probably find some more games that are both fun and educational if you look around a bit.


The current list only contains games from the Steam Store.


All Ages:

Math Rescue and Word Rescues:  These ones are classics that I grew up on.  Helps kids learn spelling and progress through some simple mathematics.

Where in the World is Carmen Sandiego:  Learn about global geography as you track down Carmen Sandiego.  This one is a new one, releasing March 16th!!!!  Finally, a new one!

Kerbal Space Program:  Silly Minion-like creatures going to space, with you controlling their space program.  Learning about astronautics along the way.


Slightly older kids:

Hack ‘n’ Slash:  This is a game that teaches programming as a mechanic in a hack and slash style adventure game.  You can reprogram things from within the game in order to get through the levels.

PC Building Simulator:  Learn how to build and repair PCs.  Useful technical skills.  Includes real-world parts.

Epistory:  A game that teaches typing, where typing allows you to progress through a story by typing the words over interactable items and enemies.


For those with VR:

HoloLAB Champions:  It teaches laboratory practices from within VR.

There are a number of applications that allow you to view museum and art galleries in VR.

Octoprint Upgrade In Progress

Whenever I would ask for help trying to get the wifi capabilities of my Monoprice Select Mini Pro working as they were originally advertised (specifically, where to get the firmware to reflash the printer’s wifi software), it seems like everyone just shouts “OCTOPRINT” at me instead of answering my question.

So, screw it, I’m trying Octoprint since I couldn’t get an answer to my original questions.  I’ve heard wonderful things about it, and it should hopefully give me most if not all the functionality I’d want long term, but it would have been nice to have been given an answer to the question that was asked.

I’m using a Raspberry Pi 4 to run Octoprint since the printer runs in a different room from my PC.  The image I started from is the OctoPi image, where someone made a disk image specifically for setting up Octoprint on a Raspberry Pi.  The initial image can be found here:

https://github.com/guysoft/OctoPi

So far it’s working pretty well, though I need to doublecheck and update my logbook to make sure everything is recorded.  Sadly, there was a gap in my process (prepping for a convention), so I’ve probably missed some important documentation.  There are a few things to note when installing one of these.

  1. The person who set up the OctoPi image is from the UK, so there are a number of localization settings on the image that need to be changed after install.
  2. DO NOT CHANGE THE PASSWORD UNTIL YOU’VE SET UP THE CORRECT KEYBOARD LOCALIZATION.  I wasn’t thinking, and the symbols when you hit shift + any number are NOT the same for various keyboard layouts, so I accidentally made my pi temporarily unusable because I couldn’t figure out where the symbols had moved to, so I had to reimage it and start over.
  3. Set an assigned IP address for your Pi from your wifi router’s control screen.  This way you won’t have to hunt for the correct IP address as you connect and disconnect various IoT devices to your network.
    1. I finally solved the issue of changing IP addresses that had caused issues with my wireless webcam, which turned out to just be a matter of setting them from the wifi router side.  I feel like a guy in a Civ game developing his tech tree out of order on that one.  It was a really simple change I should’ve already known how to do.
  4. Create a desktop shortcut that goes directly to your octoprint page.  It just makes things easier.
  5. RTSP webcam streams are not currently supported by octoprint.  If you are planning on using any of the Wyze series of internet webcams for monitoring your printer, it will not be supported natively by octoprint.  Some people have been working on workarounds, but I have not been able to make it work for myself yet.


Thoughts:

Now that I’ve at least got it running to a certain degree, here are my thoughts about Octoprint.

I like that I now have a telemetry feed, allowing me to monitor temperatures.  I got the impression there were big temperature fluctuations at one point, but now I can check the graph.  It has a default image in the background, but I was able to load my own custom one.

octoprint temp graph.PNG

I’m really enjoying increased functionality.  I no longer have to keep loading and slotting an SD card between my desktop and the printer in the other room.  I can just send files over, and tell it to print.  Much less of a hassle that way.

One of the plugins that I added is an e-stop.  I haven’t tested it, and it’s awkwardly located on the control page (right next to the settings menu), but at least it exists.

If I want to check whether the printer is ready and/or monitor it’s progress visually I currently still have to open VLC, but it’s at least there.  It just isn’t an all-in-one app setup at the moment.


Verdict:

Octoprint is an amazing tool, which gives me more information, more control, and saves me the hassle of moving files around manually.

Buuuut… it still needs some work.  Not supporting RTSP natively is really frustrating, as I was already using this camera specifically for monitoring 3D prints, but the app won’t let me view the feed directly.  There are multiple threads dedicated to people trying to figure this out, and following the directions people claim to have success with doesn’t appear to be working for me yet.


Misc Updates:

My printer is ALIVE again!  While I was performing maintenance, I discovered that the y-axis linear bearings were giving out.  That’s part of why everything was somewhat on hold with Octoprint, as I couldn’t really test it too well with a broken bearing.  I ordered parts, then discovered when I went to install them that I did not have the tools or expertise to swap them out easily.  I had thought that the bracket would come apart with screws.  Instead I found this:

linear bearing in bracket

Turns out these were press fit, so I ended up taking it to a machinist to swap them out.  He was able to remove the old bearings and insert the new ones in less than 10 minutes, and for much cheaper than if I had tried to get an arbor press to do it myself!  I’m definitely going to keep this shop in mind for future repairs and possibly for getting some custom parts made.


Link Dumping Ground:

This is kinda here as much for my reference as yours, so I can find these things again if I need to.


Here are the settings I used for setting up the printer’s config:
Monoprice Select Mini Settings for Octoprint

This page was helpful for trying to figure out a PIP not found issue with octoprint on my setup:

https://www.raspberrypi.org/documentation/linux/software/python.md

I’ve attempted these instructions to try to get my Wyze 2 webcam to work on here, but so far it’s not working for me.  I think I lack the fluency to see what’s going wrong yet.

RTSP on Octoprint Workaround


PAX East Backpacking

This past week has mostly been occupied with prepping for and attending PAX East.

Now for your weekly (cough) dose of content, here’s how I packed my backpack for the con.  I wanted to make sure I had options for gaming with my friends, supplies, and a way to carry a coat so we wouldn’t get anchored to a table watching our stuff.

Here’s the main compartment.

20200227_114247.jpg

It’s filled with the game organizer, some snacks, my wizard hat and safety goggles (which I kinda ditched after the first day), writing utensils, spare loot bag, name tags, sanitizing wipes, and snacks. The big plastic bag in the middle is one of those vacuum storage bags.  The bag allowed me to stuff my puffy longcoat into it, then squeeze the air out to reduce weight and volume and store it in the backpack.

Here’s my first iteration of the contents in the organizer that came with the backpack.  I packed it with tokens and dice for magic, tokens and pawns for D&D and other tabletop games, and a few small box games for waiting in line or at the hotel.  Before the con I removed one of the games and some of the tokens, as I realized that the pack was getting heavy.

20200225_193404.jpg

The side pockets were packed with snacks, meal bars, and water that I had shipped to the hotel ahead of the con.  I didn’t feel like having to leave lines, games, or whatever else to go get food if I didn’t have to.

20200227_114156.jpg 20200227_114144.jpg

The top little pouch held my earbuds and chargers.  The battery packs were in the laptop compartment (not shown).

20200227_114137.jpg

The upper compartment held the magic decks, RPG dice, dice tray, character coins, business cards, and some other odds and ends.

20200227_114228.jpg

All in all, this backpack worked really well for this con.


But it felt heavy for someone not used to wearing a loaded pack for long durations.  My shoulders are still sore from it!  The upside is that I had fewer circumstances where I felt the need to ask someone to watch my stuff, I was able to keep it all with me and move more comfortably.  Next time I might bring the optional belt, to distribute the load onto my hips rather than my shoulders.  Also, I did try to pare down the contents as the con went on, tailoring them to what the group was likely to do that day.

Still, I could tell we were all much more experienced at attending cons than the first time we went!  Things went much more smoothly this time, we were able to move more freely, and we were able to participate in pretty much everything we had planned to.  It gets better every time.