Category Archives: Sanctum Upgrades

Sanctum Upgrades: Card Protection/Organization

Sometimes I spend… quite a bit of money on games.  Some of them I’m not sure how long they will stay in print, and in any case, they would be expensive to replace.  In this case, here’s my copy of the Mighty Morphin Power Rangers: Heroes of the Grid (and all of the existing expansions), or at least the cards for it.

In cases like this, I recommend protecting your investment.  Card sleeves are your friend, as many a collectible card gamer can tell you.  They protect the cards, allowing the game to last a lot longer (and protect resell value).  This game has some larger cards, but I found out they were tarot size, so there are card sleeves for those, too!

Another issue for games like this is that there are hundreds of cards, belonging to many different decks.  There are decks for each different ranger, each different monster, each minion, etc.  If they were to get jumbled together, it would be extremely tedious and time consuming to find what I wanted.  On top of that, these originally came out of about a dozen different boxes.

With the plethora of card games out there these days, it is easy to find a card sorter box, and get dividers for the cards.  I sorted the cards out by type, divided the decks, and labelled the dividers.  This facilitates much faster game nights, since people won’t have to sort through hundreds of cards to find the character they want to play.

With a setup like this, my game should last a long time, and be much faster and easier to set up.   I highly recommend doing this with similar games to save yourself alot of headaches, and keep the momentum going at game nights.

Long setup times can kill the excitement of a game night, and I’d hate to be known for hosting a preventably bad game night experience.

Sanctum Upgrades: Resurrecting the CoLiDo DIY, Part 2

I’ve continued to have major issues with the printer, so I’ve been reading even more, and stocking up on new parts and tools so I can perform more intensive maintenance and upgrades on the 3D printer.

One of the issues that I’ve had is that sometime mid-print the printer will appear to lose track of where the carriages are located, and also appear to not register the end-stops.

End-Stop Replacement:

I finally branched out into soldering, and got a soldering setup and heat gun.

20200528_111246 

I’ve used this to replace all the end stops.  I cut the wires, and spliced new ones on, albeit clumsily.  There is an extra layer of heat shrink that I apparently thought was a good idea at the time, but I chose the wrong size.

20200421_132311

Build Plate Upgrade:

I decided to attach a metal build plate onto the printer, so that it would be smoother and more resilient than the standard plastic build plate.  I’m tired of having a plastic build plate that gets deeply scratched and deformed by a hot nozzle.  I think that having a metal bed will eliminate some of those issues, though it might cause more gear grinding issues if the printer loses it’s z-axis calibration again.

I had planned to do this by either 1) using binder clips to attach the plate or 2) use 3D printed mounts (along with some purchased screws, springs, and nuts).  I found that the binder clips that I bought were far too big for the printer, and also realized that I would need to make some gcode changes to account for their presence so that the nozzle wouldn’t run into them.   Even going with smaller clips would have had this issue.

20200528_114824

Photo of clips for illustrative purposes only

I also realized that the springs I had ordered were entirely too long (and possibly too stiff) to be used to mount the metal bed.  Maybe I’ll find a way to re-purpose these parts for another project later.

20200528_111209

So, I went with my default solution to problems.

Command strips.  I taped the plate to the plastic bed, and seems like it might work out alright.  I used the tape because with command strips, if it doesn’t work out you can easily remove them.  Down the line I’m wondering if I might need to replace them and add some sort of supports underneath the plate so it is even less likely to flex (it’s only supported in those 4 corners).

20200413_180932

Filament Spool Issues:

A separate issue I have is that loading and unloading filaments of different types was a pain.  The original spool holder that came with the printer requires disassembling and reassembling the holder around the spool every time I want to change filament.

20200528_113242

Also, from the angle the filament travels there is clearly a lot of friction over time.  The feed hole was originally round.

20200528_113303

I’m not sure whether this filament drag was contributing to some of the issues with the print head moving in unexpected ways, so I tried out adding an easier-to-use spool mount on top of the printer.

20200528_111306

The large parts are 3D printed, but it also uses 2 skateboard bearings.  I didn’t design this one, I found it on Thingiverse here:

Printrite horizontal spool holder

I figured that it would make loading and unloading filament much easier, and the different position plus the bearings would reduce any drag caused by the angles the filament had been travelling through.

Sadly, I’ve found that the spool will occasionally fall off the top of the printer when I try to use the new holder, and with a heavy spool that is too much of a risk of damage to the rest of the printer, so I’ve had to stop using it.  I may end up trying the version with the steps on it, in the hopes that the steps will keep the spools from falling.

I also designed and test printed a spool holder design of my own, but that ended up being it’s own separate set of issues.

Note:  This post is a case in point of why logging/blogging can be good for your hobbies.  You look at what you’ve done, what your problems were/are, and re-evaluate while you write.  I’m catching up on this a few weeks later, and I had forgotten that there was a stepped version of the spool holder that I can try.

To be continued…

Sanctum Upgrades: Pencil Cups

This is actually two items, but they are similar enough I felt I should lump them together.  I got tired of finding writing utensils everywhere in my living room (I’ve been working out of there a lot while my desktop computer was down).  I also got tired of having to dig around in the top of my toolbox for my 3D printing spatulas.

As a 3D printing guy… when you have a hammer, everything looks like a nail.  Or in this case, I’m not gonna buy a pencil cup when I have a 3d printer, time, and excess material lying around anyway.

I printed a pencil cup for the pencils and pens, and modified a dice tower model into a tool holder/pencil cup for the spatulas.  I figured I wanted something thematically appropriate for such items in my sanctum.

20200504_004144 (1).jpg 20200504_004023 (1).jpg

If you want to make your own, you can find the models here:

Dodecahedron Cup (by Jayrobox)

Cyberpunk Tool/Pen/Pencil Cup (a remix by me)

In case you are wondering how that obviously top-heavy tool holder is staying up, I used a bit of tacky to secure it to the work bench.  This stuff:

20200506_005714.jpg

It’s some stuff I originally bought to hold items in place for painting, but it is useful for securing things in general.  As a kid I remember using a blue version of this for posters and craft projects.

Sanctum Upgrades: Resurrecting the CoLiDo DIY, Part 1

I decided, what with all this extra time at home, that I’d reassemble my old CoLido DIY 3D printer and increase my range of capabilities and throughput.

Self Education:

I’ve been working on educating myself more on FDM 3D printing, so I’ll have a better background for diagnosing issues and fixing problems.  Here’s my reading list so far:

3D Printing 101

This book has some useful info I hadn’t considered, but needs a trip to the editor for readability.

20200516_145647

3D Printing Failures: 

This book has a lot of useful information, minor editing/clarity issues, but is definitely based on a lot of experience and has helped me to better build my list of setting checks, maintenance items, and tests to run.

20200516_145642

3D Printing 101 video series.

This series is on the Maker’s Muse channel on Youtube.  I haven’t made it all the way through yet, but I plan on running it in the background a lot to try to absorb more information while making progress on this and other projects.

3D Printing 101 By Maker’s Muse


Early Work:

I’ve updated Octoprint to run multiple instances so I can control both printers from the same Raspberry Pi.  Here are the links I’ve used so far for it.  It doesn’t work perfectly, but at least it works for now.

Setting up Octoprint for Multiple Printers

Multiple Printers and Octoprint

I still want to get it set up with the Wyze camera, but so far no joy.  Here’s a link to some of the materials I’ve seen compiled on the subject so far.

Octoprint and Wyze camera

I’ve been tweaking and updating the CoLiDo’s settings within Simplify3D for better print quality.

Bed levelling went pretty well.  I ran a Calicat (calibration model) and a temperature tower, which both showed significant issues.

20200330_222827

20200318_222232

I recalibrated the e-steps, and reprinted the temperature tower.  This showed little if any improvement.

I cleaned the extruder gear and radiator with canned air, but that didn’t seem to have much impact.

I also lubricated all the rods and pulleys, tightened the belts, and tightened all the screws on the printer.

And I still had issues.

To be continued…


Sanctum Upgrades: Remote Control

This one is really straightforward.  I kept losing track of my remote control.  A little bit of velcro command strip on the wall, and a strip on the back of the remote, and I had a standard place to put it back… but even then I still often forgot to put it back.  I finally decided to turn the remote sideways, adding some more command strips to the wall to support that.  From this position, It’s pointed at the tv and can be used while on the wall.  The second remote I happened to find while going through old electronics, and realized it still worked to control the blu-ray player, so I added it as well (better functionality and I don’t forget to switch which device is controlled).

Sanctum Upgrades: PPE Wall

I’m trying something new.  I thought I’d start breaking down some of the updates that clutter my other posts, particularly in the realm of trying to make my sanctum work better for me.  Maybe these will give you guys some ideas of how to customize your sanctums for the way you work.

This week’s upgrade: my Personal Protective Equipment (PPE) wall.

20200504_004051

Starting simply, I was fed up with the way I had my gear stored at/on my workbench.  Several items kept ending up on the bench or in my toolbox, which gets in the way.  I went to my old favorite for problem solving around here:  command strips.  I found a section of wall I wasn’t using for anything, added some command hooks for several items, and 3D printed a modified version of a mount for safety glasses.  I mounted everything with command strips, spacing everything out to be accessible.

Potential enhancements:  I still need a spot for my welding goggles and box of disposable gloves.  I haven’t figured out where or how I want to mount those yet.

Octoprint Upgrade In Progress

Whenever I would ask for help trying to get the wifi capabilities of my Monoprice Select Mini Pro working as they were originally advertised (specifically, where to get the firmware to reflash the printer’s wifi software), it seems like everyone just shouts “OCTOPRINT” at me instead of answering my question.

So, screw it, I’m trying Octoprint since I couldn’t get an answer to my original questions.  I’ve heard wonderful things about it, and it should hopefully give me most if not all the functionality I’d want long term, but it would have been nice to have been given an answer to the question that was asked.

I’m using a Raspberry Pi 4 to run Octoprint since the printer runs in a different room from my PC.  The image I started from is the OctoPi image, where someone made a disk image specifically for setting up Octoprint on a Raspberry Pi.  The initial image can be found here:

https://github.com/guysoft/OctoPi

So far it’s working pretty well, though I need to doublecheck and update my logbook to make sure everything is recorded.  Sadly, there was a gap in my process (prepping for a convention), so I’ve probably missed some important documentation.  There are a few things to note when installing one of these.

  1. The person who set up the OctoPi image is from the UK, so there are a number of localization settings on the image that need to be changed after install.
  2. DO NOT CHANGE THE PASSWORD UNTIL YOU’VE SET UP THE CORRECT KEYBOARD LOCALIZATION.  I wasn’t thinking, and the symbols when you hit shift + any number are NOT the same for various keyboard layouts, so I accidentally made my pi temporarily unusable because I couldn’t figure out where the symbols had moved to, so I had to reimage it and start over.
  3. Set an assigned IP address for your Pi from your wifi router’s control screen.  This way you won’t have to hunt for the correct IP address as you connect and disconnect various IoT devices to your network.
    1. I finally solved the issue of changing IP addresses that had caused issues with my wireless webcam, which turned out to just be a matter of setting them from the wifi router side.  I feel like a guy in a Civ game developing his tech tree out of order on that one.  It was a really simple change I should’ve already known how to do.
  4. Create a desktop shortcut that goes directly to your octoprint page.  It just makes things easier.
  5. RTSP webcam streams are not currently supported by octoprint.  If you are planning on using any of the Wyze series of internet webcams for monitoring your printer, it will not be supported natively by octoprint.  Some people have been working on workarounds, but I have not been able to make it work for myself yet.


Thoughts:

Now that I’ve at least got it running to a certain degree, here are my thoughts about Octoprint.

I like that I now have a telemetry feed, allowing me to monitor temperatures.  I got the impression there were big temperature fluctuations at one point, but now I can check the graph.  It has a default image in the background, but I was able to load my own custom one.

octoprint temp graph.PNG

I’m really enjoying increased functionality.  I no longer have to keep loading and slotting an SD card between my desktop and the printer in the other room.  I can just send files over, and tell it to print.  Much less of a hassle that way.

One of the plugins that I added is an e-stop.  I haven’t tested it, and it’s awkwardly located on the control page (right next to the settings menu), but at least it exists.

If I want to check whether the printer is ready and/or monitor it’s progress visually I currently still have to open VLC, but it’s at least there.  It just isn’t an all-in-one app setup at the moment.


Verdict:

Octoprint is an amazing tool, which gives me more information, more control, and saves me the hassle of moving files around manually.

Buuuut… it still needs some work.  Not supporting RTSP natively is really frustrating, as I was already using this camera specifically for monitoring 3D prints, but the app won’t let me view the feed directly.  There are multiple threads dedicated to people trying to figure this out, and following the directions people claim to have success with doesn’t appear to be working for me yet.


Misc Updates:

My printer is ALIVE again!  While I was performing maintenance, I discovered that the y-axis linear bearings were giving out.  That’s part of why everything was somewhat on hold with Octoprint, as I couldn’t really test it too well with a broken bearing.  I ordered parts, then discovered when I went to install them that I did not have the tools or expertise to swap them out easily.  I had thought that the bracket would come apart with screws.  Instead I found this:

linear bearing in bracket

Turns out these were press fit, so I ended up taking it to a machinist to swap them out.  He was able to remove the old bearings and insert the new ones in less than 10 minutes, and for much cheaper than if I had tried to get an arbor press to do it myself!  I’m definitely going to keep this shop in mind for future repairs and possibly for getting some custom parts made.


Link Dumping Ground:

This is kinda here as much for my reference as yours, so I can find these things again if I need to.


Here are the settings I used for setting up the printer’s config:
Monoprice Select Mini Settings for Octoprint

This page was helpful for trying to figure out a PIP not found issue with octoprint on my setup:

https://www.raspberrypi.org/documentation/linux/software/python.md

I’ve attempted these instructions to try to get my Wyze 2 webcam to work on here, but so far it’s not working for me.  I think I lack the fluency to see what’s going wrong yet.

RTSP on Octoprint Workaround


Sanctum Upgrades 01/27/2020: Treadmill plugin for Steam VR, Cable Management

It’s been a weekend of upgrading my sanctum in general, and my VR rig in particular.

VR Upgrades:

Treadmill

I pulled my treadmill back out of storage, cleaned it up, and lubricated it.  You have to keep the dish low-friction for it to work well, and… let’s just say it’s been a while since I’ve tried to use it.

20200126_224014.jpg

I also implemented the newer plugins from Wizdish.  It now registers as a peripheral in Steam VR!  The instructions and driver are (mostly) here, though when I contacted them it sounded like they are going to be releasing new instructions soon.

Wizdish Downloads Page

I would like to emphasize that you should read ALL the instructions, and finish implementing them before you think you have issues.  I had not doublechecked the audio settings, and in fact had not noticed that specific value ranges were listed as guidelines.  I thought that the red lines on the screen for input and output weren’t moving because of some kind of connection issue.  It turned out that it was because the sliders were in the wrong positions.  Hopefully they’ll make this a bit clearer in the next draft of the instructions.

At any rate,

I CAN FINALLY PLAY FALLOUT 4 VR ON THE TREADMILL!!!!

Right now I’m tweaking settings for the best experience, and I’m hoping to eventually start recording a new playthrough on VR, to give people a better idea of the experience in the game.  Buuuut, I may hold off on that part and just play around for a while.  I don’t want to keep having barriers between me and playing the game, especially since half the point is for me to be able to jump in easily to get some more physical activity.  I just don’t want to wait on teaching myself recording before I start spending more time in VR.

I’ve also managed to verify that I can use the new version to work with VR Chat, and I want to run through checking that these settings work on various other VR games run through Steam as well.  I was gonna try using it with the OASIS beta, but I had forgotten that it’s teleport movement only.


Cable Management

I’d decided I was tired of tripping on my headset cables, to the point I was willing to risk the possibility of messing my textured ceiling slightly.  I’m using the KIWI design VR cable management system, which I picked up from Amazon here:

KIWI VR Cable Management

They have a newer, quieter version, but apparently I overlooked them when I was searching for these.  I think they weren’t out when I’d added them to my Amazon wishlist months ago.

I decided to go with the adhesive patch hooks rather than the screw hooks, in the hopes that I can peel them off later without damage.

20200126_224050.jpg

I’m using the triple pulley configuration at the point the cable drops down from the ceiling in the center of the play area, in the hopes that it reduces the tension acting on any given pulley, reducing how much force that exerts on the ceiling.

20200126_224038.jpg

My VR Wiring

3D Printing/Printed Upgrades

Printing Upgrade

I’ve had some occasional issues/worries with power flickers, so I finally decided to put the printer on a battery backup.  Now I just have to remember to not switch off the power at the wall switch, or else I’m gonna be hearing some obnoxious beeping.  I’m only really worried about flickers or very brief outages, so I think this one will be sufficient.

20200126_234303.jpg


Practical(ish) 3D Printing

I got tired of using my gorillapod knockoff tripod for my Wyze camera.  I came across this stand on Thingiverse, made specifically for this model of camera.  It uses the joints in the camera rather than all the unnecessary degrees of freedom of the legs, which is much easier to move around and point precisely.

20200125_220426

Simple Tripod Stand on Thingiverse

When that was finished, I got annoyed that I was leaving the print time idle, so I looked around for other improvements I could make.  I realized my sonic screwdriver collection looked sloppy just laying there on the shelf, so I looked up some models for stands for them, and printed those out.  Right now they are still on top of the shelf-o-games, but at least they aren’t just lying there and getting moved around every time I move other stuff on there.  I’m debating putting them on a command strip shelf, whenever I can figure out an appropriate spot for them.

20200126_222153.jpg

Sonic Screwdriver Stands on Thingiverse

Currently printing:

I’m printing a wireless charging stand for my cell phone.  I’ve already got the charger, but it’s somewhat finicky about placement, making it almost worse than a charging cable at the moment.  The stand should make precise placement easier and allow me to not have to fiddle with it so much.

Keytar Update 01/20/2020

Lately I’ve been trying to work on the software side of things a bit lately, while I have this thing assembled (I’m still debating whether to embrace the scuffed look of the casing paint job).

For one thing, I found out that my last SD card image was 6 months old!  I had some things I had figured out since then, but as I tried new things I kept messing up the card, so I took the time to implement everything that I KNEW worked onto one card, while testing out things on a different SD card.  That way I have a safe image of all the things that work, while the other spare cards were considered expendable, and I’d only bother testing new things on them.  Once I was satisfied that I had made sufficient progress, I used Win32DiskImager to copy the image of the good card as a new baseline.

New things implemented in the baseline:

Loading all the files that I had been transferring via USB into the image so I don’t have to reload them

Establishing a new cyberdeck logo as a wallpaper (courtesy of fellow decker BillieRuben on the cyberdeck discord)

Changed screen resolution on the primary display (when I was at MAGfest I couldn’t access the buttons on some menus, which drove me NUTS).

Updating password, because apparently I had left it unlocked.  D’oh!

Implementing SSH on the Pi and installing PuTTY on my laptop.  This change was one of the more important ones!  I’ve been attempting to tweak some of the graphical settings, but every time I get them wrong, the screen on the Pi becomes unusable.  When that happens, that had forced me to swap cards, and start all over again.  It also led to me possibly corrupting cards because of powering the Pi off incorrectly, and having to wipe and reimage the cards before I could use them again.  Now, with SSH implemented, I can remote into the Pi and access the command line perfectly well, allowing me at the very least to be able to power off the Pi correctly, but it has also allowed me to continue trying new things while the display settings were messed up.  This saves a LOT of time (it takes far too long constantly reformatting and reimaging these SD cards).

Working but not baselined:

I’ve been able to VNC to share the Pi screen to an old android phone of mine.  So far that works with RealVNC Viewer on the android phone.

Instructions for VNC on Raspberry Pi

Current trials:

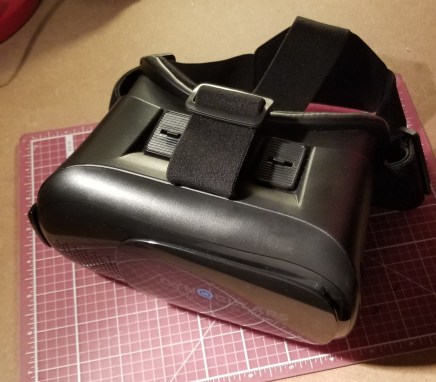
I’m attempting to use VNC to share a side-by-side version of the raspberry pi display onto my android device so I can use it as a head-mounted display (HMD) to simulate a larger monitor to work from on-the-go.  I’m attempting to use a software called VR VNC.  So far I’ve been receiving an error message about incompatible VNC security, and haven’t managed to get it to work.

20200120_203803.jpg

Upcoming tests:

Once I get VR VNC (or some equivalent) to work, I want to change the network interface from being over WiFi (which requires both devices to be on a WiFi network together, not ideal on-the-go) to being through a wired connection over USB.  Someone appears to have written a guide here:  Android Device as Screen for rPi via USB & VNC.  End goal:  wired connection between the keytar and the android headset to simulate a large monitor on-the-go, making using the system much easier… and has added cyberpunk vibes.  If/when I get this to work, I’m gonna get an old-fashioned-looking curly cable for the connection.  It just feels more authentic.

I’d like to add an app for simple-ish pass-through of the camera into an augmented reality display on the headset.  If the lag isn’t too bad, I might be able to wear the headset and still be able to see where I’m going at cons, if I want to fully indulge the costume at times.

Things I’ll have to get back to:

Attempting to switch between HDMI output (for a TV or digital projector) and back to the built-in LCD.  I was attempting to use some code I found to switch automatically, but that kept failing and rendering the screen unusable, hence the need for the SSH above.  Then I remembered the original scripts onboard for switching by command and thought I should make sure that works first.  So far I can get it to switch to HDMI, but not successfully back.  At least, the screen is still covered with some other text when it switches back.  I’ve already fixed one issue, from where the screen kept coming back upside down, but I haven’t gotten back to a useable desktop using this method.  Thankfully the SSH works and allows me to keep poking at it.

Down the line:

Now that I’m trying to add a HMD to the setup, I think I need to make some modifications to the casing.  I think I may either remove the existing branding from the case, and/or add a thematically appropriate sticker to cover it up.  I also may need to manufacture and attach an appropriate connection for hanging it from my belt securely.  I’m not going to want to wear it on my head all the time.


Random Updates:

I may or may not post more on these topics later, but I thought I’d go ahead and put these out there.

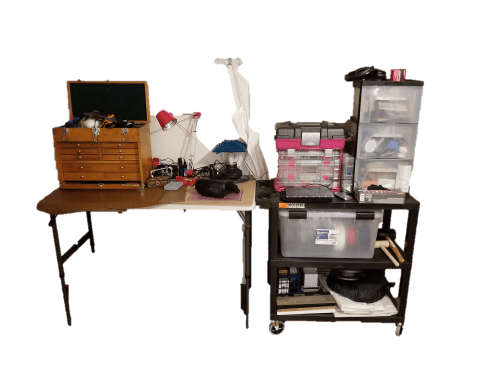
I reorganized my workspace, mostly by adding a rolling cart to store things on (and still be able to move out of the way when I need that particular floorspace back).  My living room (including the top of my workbench) was getting rather cluttered with projects, materials, etc. and it was becoming unusable.  I’ve now tossed some stuff, and reorganized the rest onto the cart, reclaiming some needed square-footage off of the floor, workbench, and other shelves.  I now even have space to run my laptop out of the way of the bench itself for when I want to SSH into my cyberdeck at the bench.

WorkbenchUpdate.png

I thought the table lamp needed a lampshade, so I designed and printed one inspired by a Japanese style pagoda roof.  The green is a reference back to the Jade Pagoda from Whovian lore.  Right now 3 out of the 4 segments match.  I ran out of material when printing a later version of the design.  I still need to get some more green filament to finish this properly one of these days.  I’ve posted the files on Thingiverse here:

Pagoda Style Lampshade

20200120_204007.jpg

Setting up my Wyze v2 Camera

So… I made a trip to Microcenter.  Fully intending to get in and out with just a couple spools of filament since I seemed to be running out of the material I was using for the light staves (Inland’s 1.75mm Silver PLA filament, #notsponsoredbutIusealotofit).

Yeah, that didn’t work out as planned.  I never walk out of Microcenter with just what I intended to buy.  I ended up getting a Wyze v2 camera.  And some purge filament.  And a new shirt…

79492771_10156897558247864_7529573493797552128_o.jpg

Just following the first rule of engineering.

I’ve been considering getting a wifi camera to watch my 3D printer from another room and potentially monitor while out and about.  So I got the Wyze v2, as it was cheap and available.  My only gripe was that it had a built-in microphone that is electronically controlled, and I’ve seen reviews of previous versions of Wyze cameras that spoke of security issues with data leaking and/or being routed suspiciously.  Supposedly this has been fixed somewhat recently.

Video footage I was okay with, because by placing the camera carefully (and putting it on the same light switch controlled circuit that I use to run the printer) I can make sure that the camera only sees what I want it to see.  Most of the time I won’t care if people are watching my 3D printer run.

However, sound isn’t so simple a matter.  Sound bounces around, and I don’t want any private conversations accidentally (???) being streamed. But, I figured, what the heck, it’s a $25 camera, I’ll open it up and cut the microphone out if I have to!  If I mess it up, it’s not like I’ve broken a super expensive camera in the process.

When I got home I found out that other people have the same concerns, and this guy in particular had my back with his instructional video:

Hardware disabling the mic on WyzeCam v2

Turns out all you have to do is disassemble the thing, take a pair of pliers, and pull the microphone off the circuit board.  No cutting or de-soldering required!  I do highly recommend viewing his blog and watching the video, there were a couple tricks I didn’t realize at first.  Wasn’t too hard, but this other video shows the trick to getting the bottom off easier than the other guy’s.

So far so good, the camera now streams video but not sound.  But it only goes to the phone apps.  Dammit.I did a bit of searching around, and found this guide made by a channel called Gross Technology.  It explains exactly how to set it up for streaming to your PC on the same network.  Apparently it’s a new feature for these cameras.

Now I can get it to stream to VLC.Demo of printer monitoring2.pngOne step closer to my goal!  I eventually want to set up a control page where this video feed is streamed so I can view it remotely, whether on my phone or PC, ideally with a connection to the wifi printer controls so I can kill a failing print.  Needs a big red button on it.  That’s going to take a bit more than I plan to work on at the moment.  I just couldn’t resist though, and so far it’s kinda been a one evening fun learning project.

I did take enough time to start setting up the printer’s wifi controls, but that’s probably gonna require a firmware update to get working properly.  And those come with big warnings of DO NOT DO THIS IF YOU CAN’T BE WITHOUT YOUR PRINTER FOR A FEW DAYS.  Given that I’m in the middle of a couple of time sensitive projects with it, I think I’ll wait till they are done.  Maybe make a day of it along with the other maintenance items that need to be done.

In the meantime, I can check on my prints from within VR using Oculus’s desktop viewer without having to pause and duck out of VR.  Eventually I’ll be able to check whether my printer has something on it and send files to it over the wifi.  I hope to streamline the printing and monitoring process as I go along.  

Addendum: I use VLC to watch the video stream for now. Turned out I had been using the Windows store version, which is stripped down and I also couldn’t figure out where it was located. That was only an issue because I was trying to make a direct shortcut to the stream on my desktop. Anyway, I’ve installed the full version of VLC, and now have a shortcut that goes directly to the camera feed, so I don’t have to go through additional steps anymore. Doubleclick to watch the printer. Done.