Category Archives: Ramblings From the Sanctum

PAX East Backpacking

This past week has mostly been occupied with prepping for and attending PAX East.

Now for your weekly (cough) dose of content, here’s how I packed my backpack for the con.  I wanted to make sure I had options for gaming with my friends, supplies, and a way to carry a coat so we wouldn’t get anchored to a table watching our stuff.

Here’s the main compartment.

20200227_114247.jpg

It’s filled with the game organizer, some snacks, my wizard hat and safety goggles (which I kinda ditched after the first day), writing utensils, spare loot bag, name tags, sanitizing wipes, and snacks. The big plastic bag in the middle is one of those vacuum storage bags.  The bag allowed me to stuff my puffy longcoat into it, then squeeze the air out to reduce weight and volume and store it in the backpack.

Here’s my first iteration of the contents in the organizer that came with the backpack.  I packed it with tokens and dice for magic, tokens and pawns for D&D and other tabletop games, and a few small box games for waiting in line or at the hotel.  Before the con I removed one of the games and some of the tokens, as I realized that the pack was getting heavy.

20200225_193404.jpg

The side pockets were packed with snacks, meal bars, and water that I had shipped to the hotel ahead of the con.  I didn’t feel like having to leave lines, games, or whatever else to go get food if I didn’t have to.

20200227_114156.jpg 20200227_114144.jpg

The top little pouch held my earbuds and chargers.  The battery packs were in the laptop compartment (not shown).

20200227_114137.jpg

The upper compartment held the magic decks, RPG dice, dice tray, character coins, business cards, and some other odds and ends.

20200227_114228.jpg

All in all, this backpack worked really well for this con.


But it felt heavy for someone not used to wearing a loaded pack for long durations.  My shoulders are still sore from it!  The upside is that I had fewer circumstances where I felt the need to ask someone to watch my stuff, I was able to keep it all with me and move more comfortably.  Next time I might bring the optional belt, to distribute the load onto my hips rather than my shoulders.  Also, I did try to pare down the contents as the con went on, tailoring them to what the group was likely to do that day.

Still, I could tell we were all much more experienced at attending cons than the first time we went!  Things went much more smoothly this time, we were able to move more freely, and we were able to participate in pretty much everything we had planned to.  It gets better every time.


COM|POST: 3D Printer Feature Wishlist

After a few short years of using 3D printers, and reading up on them, here’s my wishlist of features that I’d love to have incorporated (or incorporate myself) into one FDM printer.


Accustomed Features:

These are ones I’ve gotten used to on my Monoprice Select Mini Pro:

Removable build plate:  Allows me to remove the print bed and work on removing the item from the bed at a more convenient height on my workbench.

Heated bed: Allows for more material options, and prevents some warping issues.

Build-tac plate:  Build plate surface material that doesn’t require frequent blue tape replacement or gluing.

Self leveling:  Leveling the printer manually is tedious and annoying, particularly if it shakes itself loose periodically.

Webcam:  I use a Wyze 2 camera to monitor my printer from other rooms and/or on the go, so I can tell if there is an issue.  I plan to integrate this with wifi control down the line, but I haven’t implemented that yet.


Common Features:

Commonly available, but not currently on my setup.

Direct drive:  My printer uses a Bowden tube setup, which doesn’t handle flexible filaments, but direct drive printers (printers where the extruder motor is directly above the nozzle) can.

Wifi printing:  Mine doesn’t work, at least not from the printer.  This is optional for me now that I am experimenting with Octoprint on a Raspberry Pi to control my printer, so it probably doesn’t need to be onboard.

Large print volume:  This has mostly been a matter of cost so far.  A tradeoff between quality and build size for me for my last purchase.

Printer enclosure:  Keeps the temperature more constant for printing.  Also would enable an air filtration system to avoid issues with toxicity and particles for a wider variety of print materials.


Less common features:

I’ve thought up or heard of these, but I don’t often see them as standard features if at all.

Filament Sensor:  Detects when filament is running out, pauses the print, and alerts the user to change out the filament without ruining the print in the process

Runaway heating cutout:  I’d just like a bit more assurance that I won’t have a printer fire issue with the nozzle and/or the heated printed bed.  I’d want the temperature sensors to be able to trigger the print to cancel and turn off the power to the heating systems if they started to get to dangerous ranges.

Multimaterial printing:  I’d like to experiment with some of the options of multimaterial printing, particularly with unusual filaments worked into common ones.

Fire suppression:  Call me paranoid, but I’d really like to make absolutely sure there is no chance of an out of control fire.  I’d want a system to detect fires, cut the power to the printer, and flood the enclosure with carbon dioxide, before venting to the exterior of the building through a filtration system.

Big red button:  I want a kill switch for the printer so that if something is going wrong I can immediately kill the print.  Preferences are for it to turn off power to the heating elements, stop all motion, and then raise the Z axis slightly away from the printer.  Needs to be a bit away from everything else, and be big, red, and slappable.

COM|POST 02/10/2020: A Skypirate’s Life For Me

Forest of Oakenspire Airship:

This past week’s hobby work has mostly been a matter of 3D printing the airship shown at the top of this post. The models are from a great 3D model creator who goes by Ecaroth (he’s on Kickstarter, Thingiverse, Facebook, and Heroes Hoard).  I love using his designs.

I got the STLs for this model as part of a kickstarter campaign a couple years back, but never got around to printing it until recently.  It’s taken me a while to trust a 3D printer to run unattended long enough for the process.

Each section of the hull has taken 8-13 hours to print.  Sadly, some of the pieces are somewhat warped, but it’s only really obvious on one piece (it was printed at a different orientation).

20200210_205422

Still came out pretty awesome in my opinion.  It uses openlock clips, so I can connect these modular pieces and even be able to lift it up and move it.

Lifted Airship.jpg


Printer Issues:

My 3D printer gouged itself this past week, so I had been making do with using blue tape over the build tac sheet.  I probably should have turned off the heat, as I think that is part of what has caused the blue tape to loosen and the prints to warp.

Before it gouged, it had some issues with one corner acting as if it’s much higher, which the autoleveling software is supposed to take care of.20200206_093730.jpg

I tried troubleshooting the levelling, but it ended up gouging the bed after a slight change mid print.  As you can see at the beginning of the print, it was showing indications of being way too high, but gouged as I adjusted it slightly while it moved to the problematic corner.

20200206_193100.jpg

I tried again more carefully, and it gouged at the very beginning of the print!  I’ve been using blue tape to make do over the gouges, but it’s warped them slightly (hence the bow of the ship not being as well fitted as it should be).

I’ve contacted Monoprice tech support, and apparently I didn’t get the same helpful tech support person that I did the last time I had a problem.  I guess with the information overload of extra details that I tried to get help on all at once (mostly minor things that had added up to annoy me), the thought I was trying to get another replacement printer (my first Select Mini Pro had a faulty z-axis sensor).  After emailing back, they gave me a link to replacement parts, so I finally have a place to go to order those on my own!

GigDigit

I’m stocking up on some parts now.  Spares to save me a lot of time trying to get a shipment when things are broken.


Keytar Cyberdeck Upgrades:

I still haven’t gotten around to some of the issues on the cyberdeck build that have bugged me… but I’ve been doing a lot of thinking and chatting with the deckers on the cyberdeck discord about various items.  Any guesses on what I plan to do with this new parts order?

20200210_205723.jpg
Random stuff:
I just binge watched the entirety of the mainline Dragon Ball Z Abridged series…. and then shortly after I finished they announced that they were ending it.  I don’t disagree with them, but it’s just really weird timing.

Sanctum Upgrades 01/27/2020: Treadmill plugin for Steam VR, Cable Management

It’s been a weekend of upgrading my sanctum in general, and my VR rig in particular.

VR Upgrades:

Treadmill

I pulled my treadmill back out of storage, cleaned it up, and lubricated it.  You have to keep the dish low-friction for it to work well, and… let’s just say it’s been a while since I’ve tried to use it.

20200126_224014.jpg

I also implemented the newer plugins from Wizdish.  It now registers as a peripheral in Steam VR!  The instructions and driver are (mostly) here, though when I contacted them it sounded like they are going to be releasing new instructions soon.

Wizdish Downloads Page

I would like to emphasize that you should read ALL the instructions, and finish implementing them before you think you have issues.  I had not doublechecked the audio settings, and in fact had not noticed that specific value ranges were listed as guidelines.  I thought that the red lines on the screen for input and output weren’t moving because of some kind of connection issue.  It turned out that it was because the sliders were in the wrong positions.  Hopefully they’ll make this a bit clearer in the next draft of the instructions.

At any rate,

I CAN FINALLY PLAY FALLOUT 4 VR ON THE TREADMILL!!!!

Right now I’m tweaking settings for the best experience, and I’m hoping to eventually start recording a new playthrough on VR, to give people a better idea of the experience in the game.  Buuuut, I may hold off on that part and just play around for a while.  I don’t want to keep having barriers between me and playing the game, especially since half the point is for me to be able to jump in easily to get some more physical activity.  I just don’t want to wait on teaching myself recording before I start spending more time in VR.

I’ve also managed to verify that I can use the new version to work with VR Chat, and I want to run through checking that these settings work on various other VR games run through Steam as well.  I was gonna try using it with the OASIS beta, but I had forgotten that it’s teleport movement only.


Cable Management

I’d decided I was tired of tripping on my headset cables, to the point I was willing to risk the possibility of messing my textured ceiling slightly.  I’m using the KIWI design VR cable management system, which I picked up from Amazon here:

KIWI VR Cable Management

They have a newer, quieter version, but apparently I overlooked them when I was searching for these.  I think they weren’t out when I’d added them to my Amazon wishlist months ago.

I decided to go with the adhesive patch hooks rather than the screw hooks, in the hopes that I can peel them off later without damage.

20200126_224050.jpg

I’m using the triple pulley configuration at the point the cable drops down from the ceiling in the center of the play area, in the hopes that it reduces the tension acting on any given pulley, reducing how much force that exerts on the ceiling.

20200126_224038.jpg

My VR Wiring

3D Printing/Printed Upgrades

Printing Upgrade

I’ve had some occasional issues/worries with power flickers, so I finally decided to put the printer on a battery backup.  Now I just have to remember to not switch off the power at the wall switch, or else I’m gonna be hearing some obnoxious beeping.  I’m only really worried about flickers or very brief outages, so I think this one will be sufficient.

20200126_234303.jpg


Practical(ish) 3D Printing

I got tired of using my gorillapod knockoff tripod for my Wyze camera.  I came across this stand on Thingiverse, made specifically for this model of camera.  It uses the joints in the camera rather than all the unnecessary degrees of freedom of the legs, which is much easier to move around and point precisely.

20200125_220426

Simple Tripod Stand on Thingiverse

When that was finished, I got annoyed that I was leaving the print time idle, so I looked around for other improvements I could make.  I realized my sonic screwdriver collection looked sloppy just laying there on the shelf, so I looked up some models for stands for them, and printed those out.  Right now they are still on top of the shelf-o-games, but at least they aren’t just lying there and getting moved around every time I move other stuff on there.  I’m debating putting them on a command strip shelf, whenever I can figure out an appropriate spot for them.

20200126_222153.jpg

Sonic Screwdriver Stands on Thingiverse

Currently printing:

I’m printing a wireless charging stand for my cell phone.  I’ve already got the charger, but it’s somewhat finicky about placement, making it almost worse than a charging cable at the moment.  The stand should make precise placement easier and allow me to not have to fiddle with it so much.

Super MAGfest

I was at Super MAGfest (Music And Gaming festival) this past weekend.  It’s in National Harbor, Maryland the first weekend of January every year.  As you would think from the name, it’s mainly focused around music and gaming… but there is a LOT of cosplaying and associated photography as well.  It’s been recommended to me for years, and this is the second time I’ve gone.

Super MAGfest

Convention Prep:

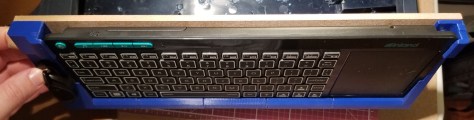
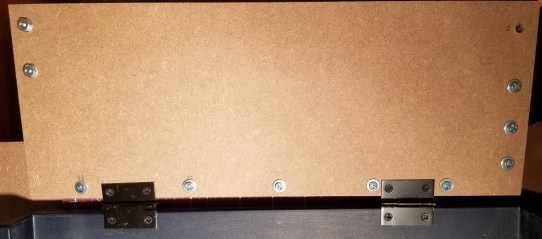
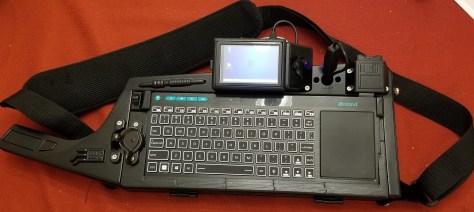
I did another temporary build of my raspberry pi keytar cyberdeck to show off at the convention.  I loaded it up with 80s music and often had it cycling through songs as I wandered the halls of the convention center.

20200102_232011.jpg

It was extremely gratifying to get stopped in the hallways and/or called over to answer questions about it!  When you’ve worked on something for months, it’s satisfying to find that other people think it’s about as cool as you think it is.

Since I had the cyberdeck running, I decided to do a somewhat subtle cosplay as a Decker/Netrunner/Console Cowboy (depending on your cyberpunk franchise of choice).

20200103_225240.jpg

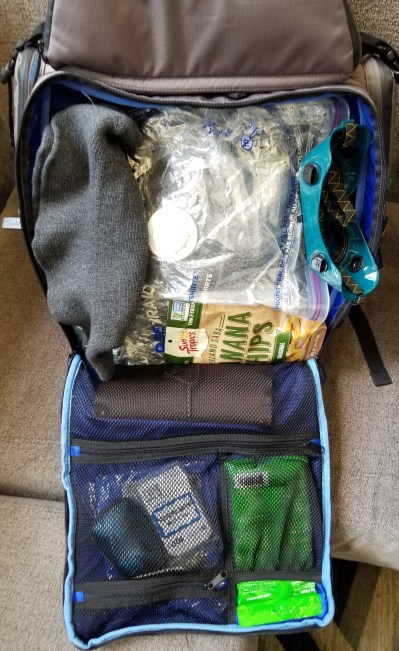
I picked up some new gear before going to the convention, just to be prepared.  I stopped by REI and picked up a backpack cover (to protect the keytar when I was walking outside through rain) and a 20L water resistant nylon backpack that compresses to be smaller than a soda can (an adventurer’s gotta have a lootbag).  I was so glad I did, as it was raining much of the day Saturday.  I was able to keep my keytar and loot dry, and able to carry a good bit more than my satchel would hold.

20200107_145721.jpg

20200107_145841.jpg


Convention Shoutouts:

I figure the best way to describe most of my experiences at the convention this year is in the form of shoutouts to some of the awesome people and groups that I met while there.


NOVA Labs:

NOVA Labs Main Website

NOVA Makers Meetup Group

I talked to these guys in the convention makerspace they were hosting (which I think is an AWESOME idea).  They have a permanent makerspace facility in Reston, VA.  I had a good conversation with those guys about some things people do with 3D printing, CNC milling, and CNC embroidery.  Also some mutual fandoms.


YNOT Cosplay:

YNOT Cosplay Instagram Page

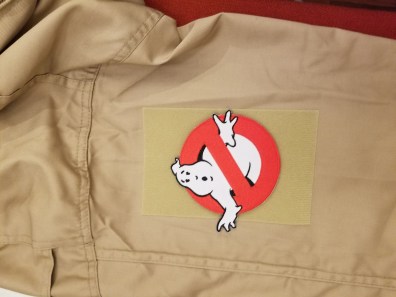
I ran into this guy in the hallway a few times.  He’s a Ghostbusters cosplayer who has done an AMAZING job upgrading his Spirit Halloween proton pack.  I mean, way beyond anything I had dreamed of doing.  The lights and sound are awesome, the proton pack has an overheat sequence inspired by the 2009 video game, and he’s soon even gonna add a smoke dispenser to cap off that sequence.

He also had a really cool custom belt gadget (I can’t remember the name at the moment) with nixie tubes and other interesting electrical bits.


Duffy Austin:

DuffyAustin.com

This guy is a tabletop game designer who was having people playtest a new game he’s developing, called Scrap Packs: Deckbuilding RPG.  It’s in the very early development stages, but it’s a highly entertaining game based around the following ideas:
You are handed randomly drawn cards with equipment on them, and THEN you design your RPG character based on the setting the gamemaster sets.

When you name the character you give them a title, which the GM might later use to justify or deny whether you have the ability to do something.

You can combine these cards, along with a currency called Skrap, to make new items, as long as you can give it a name and describe it’s function.  The GM makes the stats on a simplified system to facilitate flexibility.

Plot elements are a combination of what cards come up as the game progresses, and how the gamemaster decides to implement them.

Example of my experience:

I began with a rusty spoon, a ballpoint pen, a feathered cap, an aluminum bucket, and a lucky coin.  We were told that our characters were from a high school, going to a cabin in the woods scenario.  I called my character “Eric the Survivalist,” and declared that he was a guy way too into “surviving” and who nobody trusted with anything dangerous because he might hurt someone with it, so things like guns would be yanked out of his hands by the party.  Hijinks ensued, including stabbing aliens with a rusty spoon (his weapon of choice), and using the skrap mechanics to have the party build a human sized slingshot and launch him at the lead alien while wielding a rocket-powered hammer and screaming “LEEROY JENKINS!”

Fun times.

I look forward to seeing the fully developed version of this game.  It’d be great for when I wanted to get people into RPGs while being rules-lite and not prepping a lot in advance.


Justin Wood:

This artist’s work caught my eye.  He had a couple comics in a series called NPCs, where NPC characters are dealing with the aftermath of a new hero’s inciting event (the town burning down) and coping with losing people and rebuilding without the help of the town’s strongest guy.  I’m enjoying it so far, and hope to see more!

I’m having trouble tracking down his webpage or listing, or I’d include it here.


Cait May:

This artist makes a lot of RPG related artwork, a lot of which seems to be inspired by The Adventure Zone, Critical Role, and her own D&D adventures, though what initially caught my eye was an Animorphs based painting.  I really like her art style, and she draws some comics, too.

CaitMayArt.com

Irregular Comic


Glitch Gear:

These guys had some fun apparel.  I got me another “Trust me I’m an Engineer shirt”… but this time with the Team Fortress 2 Engineer on it.  At this rate I might be collecting these as a theme.  Sadly, they were out of the other shirt I wanted.  Hopefully they’ll restock the “Use More Gun” engineer shirt.

Glitch Gaming Apparel


Miscellaneous:

I didn’t end up going to any of the scheduled events I had originally planned to go to, but that’s alright.  I was able to try new games, catch up with friends, meet new people, snag some loot, and see some cool things.  There were museums for the history of video games, performances of music all around the convention center, a large merch floor, and game demos galore (both tabletop and digital).  It was all around a well spent day for me.

Project Update 11/6/19: The Scratchening

The Scratchening:

This last weekend I was attempting to “improve” my keytar case paint job.  There were some blobs of paint from how I had painted the first couple coats.  I thought I was following the advice of some other people (particularly the Cyberdeck discord, yes, it’s a thing).

Apparently I failed.

I sanded the case and parts, and put another coat of paint on… and now there are visible scratches.  I’ll have to sand it again… much more carefully, and then repaint.  I’m not sure how well it will show up in the photos.

20191106_194718

20191106_194800.jpg

20191106_194745.jpg

These are apparently not what was meant by “use coarse, medium, and fine sandpaper”.

20191105_075811.jpg

I’m still annoyed at myself, and per further elaborated advice, I’m going to re-sand the thing again with a series of finer grains of sandpaper on a proper sanding block.  “When you think you’re done, keep sanding.”


In other news:

Over the weekend I had to clean/lube/recalibrate my printer.  I had been noticing some layer shifts in some prints, and this was the easiest possibility for me to address.

20191030_080856.jpg

Seems to have worked, as my prints since then have been good so far.  I needed something to test a long print time on something with verticality to make it obvious if these shifts occurred again.  I decided to look for an appropriate Benchy, and someone had my back!

20191103_081219.jpg

Benchy-209 on Thingiverse

Optimus Prime!  As a no assembly required print!  I was in the mood for printing a robot, and thought to look him up.  He transforms!

20191103_183000

20191104_071320.jpg

Optimus Prime on Thingiverse

COM|POST: Quick Project Weekend in Review 10/28/19

So, I’ve apparently got a lot to log this week, which is both awesome (yay, stuff was accomplished!) and annoying (shards, I’ve gotta log all this stuff).

I’ll try got go through it pretty quickly, since it’s multiple projects, and not a lot of focus on any one project.

Keytar Progress:

I finally found time to epoxy and prime my keytar.  I’m gonna need to get some sand paper to smooth out some parts I messed up on (I’m new to spraypainting).  Later I’ll put on another layer (I missed some stuff) or more.  Then it’s back to maybe sanding a bit, stickering, clear coating, and matte coating.  Here are a few images of where things stand now.

Keytar Parts.jpg

Keytar Whole.jpg

I’m still debating how I want to paint these greeblies.  Maybe a metallic color of some kind?

Greeblie1.jpg

Greeblie2.jpg

And here is what I’m thinking of for stickers at the moment.  I’ve got a bunch of other random stickers from a Ready Player One bundle that I’m considering layering under these, but I wonder whether I should do that, or if it might cause problems.  Also might cause these top stickers to not stand out as much.

Proposed Stickers.jpg


Costume Update:

I’ve been updating my Ghostbusters costume this year.  I’m able to fit into an actual jumpsuit this year, so I got one.  And it’s a bit too big on me (yaaaay for weight loss, but boooo, I was hoping for a good fit).  Still, at least I can wear it!  And I can (kinda) use one web belt instead of needing two.

Anyway, new jumpsuit means I need to sew patches again… or if you are lazy like me (and know that you are gonna get another suit later) you attach them to Velcro for easy transfer.  Still had to sew the name patch onto the Velcro strip that came on the uniform, but just had to attach the adhesive Velcro panels for the logo patch.

Ghostbusters Patch.jpg

I also decided since I suddenly had free time to work on projects that I’d go a bit further, and make the connectors and tube that hang off the left side of the uniform.  3D models were available on Thingiverse here:

Ghostbusters Leg Hose Connector on Thingiverse

I printed that sucker out, ordered some magnets that I superglued in, and attempted to dye the hose.

Hose and connector.jpg

connector-magnets.jpg

The dyeing didn’t go too well, but at least it is slightly greenish, which was kinda my intent.  Yes, per the first movie they are supposed to be yellowish… but I didn’t like the catheter explanation for the tube that the color implies.  I went with the video game option that implies it has something to do with slime, and tried to dye it neon green.  I think I didn’t account for some things in the process.

Also, on the printer right now is the LifeGard II monitor that the Ghostbusters wear on their belts.  Apparently it was a thing firemen would wear that would alert people if the wearer wasn’t moving for an extended period of time.  Mine is nonfunctional, just a shell, but I like adding detail.  I’m having to do it at 80% scale because anything larger wouldn’t fit on my tiny printer.

Lifegard II 3D Model on Thingiverse


Random Printing:

I can’t remember why or how I came across this box on Thingiverse, but I found it interesting, so I printed it.

inro-box-closed.jpg

Inro Top.jpg

inro-box-open.jpg

I also thought I could use a screw tray with all the screws I’ve been taking out of the keytar prior to painting, so I printed this one (after running it through the customizer) and used some of my extra magnets on it.  I was too frustrated with superglue at the moment (I forgot that it kinda spews when it’s first opened) so I just have painter’s tape holding it in the slots right now.

Screw Tray.jpg

Customizable Magnetic Screw Tray/Box (with optional lid) on Thingiverse


Gaming:

The Outer Worlds came out last Friday.  This game is AMAZING, and I’m already getting ideas of costume props that I would like to either find or create models for.  There are a lot of cool technological bits on the outfits in that game.

I think I may have to do a review of this at some point because I LOVE THIS GAME.  Briefly:  companion social interactions are believable and contribute to the narrative, I’m not constantly chasing weapon upgrades, and I’m not bogged down in junk collection.

Downtown Columbia Mini Maker Faire

I went to the maker faire today.  Definitely a different environment from one of the bigger maker faires, and felt more casual (and comfortable).  Also kinda nice that with it being outside I got to enjoy some fresh autumn air.

Here are some of the people I came across and chatted with while I was there:

Tech Changers  www.techchangers.org

  • As I recall they teach various tech-related subjects in schools.

Sayakat Cosplay www.sayakatcosplay.com

  • A cosplayer who demonstrated some of the techniques for making cosplay armor with foam and a heat gun.

Turta LLC turta.io

  • A group that was showing a variety of Raspberry Pi hats.

ChocolateFrogs ChocolateFrogs Flickr

  • LEGO designs!  I particularly enjoyed the Stargate gateroom with Jaffa fighting SG-1.  Also, the 11th Doctor with Finn’s face, from Adventure Time.  And THE DREAD GAZEEBO!

Digital Harbor Foundation’s 3D Print Shop www.digitalharbor.org/printshop

  • A youth operated 3d printing shop.  Neat.

Rebel Legion www.rebellegion.com

  • Star Wars cosplayers.  There was a woman dressed in a well-made Rey costume, multiple lightsabers, and a guy in a really elaborate cosplay of Baze Malbus, complete with 3d printed heavy repeater cannon!

MoCo Makers www.mocomakers.com

  • These guys had some interesting stuff, including a few kickstarters they were running.  Some things that caught my attention were that they had some chips made at one point, and they had a cool display program running that changed live camera footage into outlines in an image.

Circuit Breaker Labs CircuitBreakerLabs Etsy

  • This shop makes jewelry from circuit boards.  I thought this one was particularly appropriate for the technomancer theme.
  • I got this cool necklace from this group.20191013_204010

Project Update 09/30/19: Keytar Tray

This past weekend I finally drilled the holes and test fit the screws into the nuts hidden inside the backs of all the tray mount pieces.  Here’s how I have those concealed.

Retaining nuts.jpg

Retaining nuts

The screw hole is premade into the model, and there is a corresponding slot for the nut to slide into.  The slot is shaped to prevent it from turning.  With all these bits installed, here’s the keyboard held in it’s tray for ease of access to the inside of the case.

Keyboard in tray.jpg

Keyboard in tray… finally

For reference, here’s what the backside of some of the pieces look like.  The groove at the bottom is to match the screws that punch through for the hinges.  You can also see a couple of the screw holes.  I was gonna show more… but I really don’t feel like disassembling the whole tray right now.

20191003_203523.jpg

A couple of these holes weren’t centered quite correctly, but conveniently I was able to gently carve out the holes in the direction I needed to shift them with my 3D printing chisels.  Well… except apparently I misaligned one of the holes within a 3D printed component with the retaining nut slot, but the piece seems on solidly enough without it.  If I care enough to later I will fix the model and replace the component.  The way I’ve designed it I can replace individual parts later.

20191003_203200.jpg

The back of the tray with my adjustment marks.

Turns out I was still missing some screws earlier this week, and I got fed up with getting screws piecemeal when I’m always using #6-32 machine screws.  So, through great technomancy (Amazon) I summoned this kit.  It’s got everything I could possibly need in #6-32 machine screws.

Screw Case.jpg

I’m sorry Home Depot, but we’re not exclusive

I also tried yet again to fix the underpower issue with the Pi itself.  I ordered this battery, and a cable with inline switch that is specifically supposed to be for a Raspberry Pi.  For a little while it seemed to work… and then I started seeing that annoying lightning bolt again.  This battery is supposed to have smart output of 5V and up to 3.1A (depending on what is attached), but it still showed a power warning.  For reference, a Pi is supposed to use 5V and 2.5A.  It may be because I had another peripheral (a thumb drive) installed at the time.

New Battery.jpg

New Battery

Pi Switch.jpg

New Cable

In the middle of editing this, while taking photos, I noticed this on the back.

20191003_203017.jpg

D’oh!  This appears to have a 2.4A limit per port like some of the others.

Facepalm.jpg

Anywaaay, I’m gonna keep tweaking this thing, and see if it has something to do with a USB drive being plugged in or a change I made in the OS a while back that was supposed to use more onboard memory on the Pi rather than on the SD card.

Wish me luck!  Or, better yet, if you have any suggestions on mobile power supplies for Raspberry Pis (that don’t involve adding a hat inside the semi-sealed case of the Pi), please let me know.


In other news:

Still playing through Borderlands 3 as Moze.  Kinda hard to say no to having my own mech.  I bet you can guess my main in Overwatch back when I played.

I think my filament spool had a couple discontinuities in it.  I was trying to do a long print overnight this week, and this was the result.

20191001_081424.jpg

No power of Greyskull.  I am le sad.

I assumed that the filament had tangled and snapped.  When I went to unsnag the spool of filament… I found this:

Discontinuity.jpg

A segment of filament that was disconnected on both ends.  Makes me wonder if I had a faulty spool and just hadn’t come across the break in the section yet.


Side lessons:

Don’t ever get attached to a character in Dungeon Crawl Classics, they will die unexpectedly.  And I’m not just talking the level 0s you would expect to die.  I think I’m gonna adopt the Goblin Slayer Abridged method in the future.

NO NAMES