Category Archives: Sanctum Upgrades

VR Sensor Rerouting Update

The hooks appear to be working pretty well, though only time will tell whether they support the weight properly long-term.  I decided not to rearrange the sensors due to the hassle involved, and just repointing them a little in their existing mounts seems to be enough to get better coverage.

And the process of just redoing the wires was enough of a pain to begin with.

  1. Removing the wires from the walls (I accidentally tore off some paint in one spot)
  2. Removing old tape from the wires
  3. Cleaning gunk off of long wires with tiny alcohol wipes (there are better ways to do this, but I didn’t think of it beforehand).
  4. Measuring the locations for the new hooks.
  5. Spending thirty seconds per hook pressing them in place for the adhesive to stick.  (This suuuuuuuuuuuuuuuuucks.  Repetitive tasks with a lot of force on your fingertips starts to hurt.)
  6. Clipping all the wires into place.

Also, You have to be careful with corners and long stretches.

Rerouted Wires 2.jpg

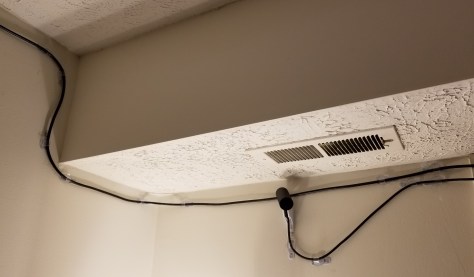
You probably can’t tell in the upper left, but when I was making the 90 degree turns in plane, you might have to be careful with which way you make the hooks face based on the direction you expect tension in the wires.

Also, at the sensor itself, having those additional couple of hooks is kinda crucial, to take torque off of the wire as it leads into the sensors so that it doesn’t rotate or get pulled out of the mount after you’ve set it.

Anyway, it took a while, but it’s (mostly) done.  There is a stretch of wire that sags a bit because you are supposed to put a hook every 2 feet, but that section of wall is completely taken up by a window, and the frame is not a flat surface (the hooks need a flat surface to adhere to).  I’m debating adding some additional hooks at an angle on the opposite side to kinda provide some friction to hold the wire up a little better.

There is a bit of annoyance at the end of the setup.  I clicked on the “would you like to set up 360 tracking” popup after plugging all of the sensors back in, and it ran through the entire setup process… which includes the unskippable tutorial sequence with the small robot.  Thankfully, it’s a well-made sequence, so it’s not too bad having to go through it again.

Weirdly, throughout that entire in-VR portion of the setup, there was a message inside the headset saying that the headset wasn’t plugged in.  Um… I didn’t have mirroring setup for this… so… how does that message serve any purpose?  How do you see the “no headset plugged in” message if you don’t have a headset plugged in?

In any case, I am DONE with this for a while, and it looks much nicer than the masking tape and the painter’s tape before it.  It should hold better, too.  Command strips are like magic for hanging stuff on my walls without damaging them.  One could even say… technomagic…

VR Sensor Rerouting

In order to get a 3 sensor setup for 360 degree coverage with my Oculus Rift, I had to route cables around the top of the walls quite a while back.  First I mounted it with painter’s tape, but that was glaringly ugly.  I’ve also tried variations/combinations of double-sided tape and masking tape.  Given that the color of the masking tape is closer to that of my walls, it’s not quite as bad.  However, I realized later that this is leaving a nasty residue on the wires, and still sometimes falls.  And still looks crappy.

So, I’m trying something new.  Previously I’ve picked up some pieces that are for routing cables for phone chargers and such, but they are a bit of a pain to use.  More recently, I picked up some command strip hooks meant for wiring holiday lights.command hooks.jpg

I took down the sensors and the extension wires, and spent rather longer than I’d like cleaning the gunk off of them with alcohol wipes.

My next step is to figure out how I want to rearrange my sensors (I’m doing some reading/viewing on Oculus sensor layouts), moving the sensors with some new command strips, putting the command hooks in to support the wires, and clipping all the wires in.  It’s a lot of work, but hopefully it should get me some better sensor coverage and look a lot neater in the process.

VR Rig Upgrades: SSD Capacity

An issue I’ve been fumbling around with for a few months now is upgrading my VR rig with a new Solid State Drive (SSD).  I had originally mounted it in a hot swap port on my PC (and had to create a case over it to protect it).  However, it eventually made my PC unstable, and I had to remove it and send it in for warranty replacement.

The replacement came in a few weeks ago, and this time I decided to install it as a replacement for the existing SSD inside the computer.  When I had had my PC built years ago, the computer was built with an SSD to run the operating system and some programs, as it would make them load a lot faster than on a standard hard disk drive.  This was fine.  However, it has filled up over time, despite me installing most things to the hard drive instead.  I had kind of reached a stable maximum on that drive.

The problem was that the load times for games was getting rather lengthy in newer games, largely in part to the time it takes to read the data off of the hard disk.  In regular games, it’s no big deal, but in VR, load times make a HUGE difference.  You are sitting or standing there, blind to the world, with very little input except whatever loading screen the game designer had incorporated… and they didn’t always think those through (holy crap, the glare of a bright logo in a dark background is miserable).

This is why I had bought the new SSD in the first place, to add a terabyte of storage space to transfer all my VR games to.  Anyway, this time I decided to just replace my old SSD with it, and move everything over.  This is where I had gotten stuck until I did some research and talked with a few people I know who are more knowledgeable in this area.  I finally got it to work this past weekend, and I’ve been trying to tweak and move stuff since then.

Here are the main things I wish I had known more quickly going into this.  I know this is not going to be the best detail, but it should be enough to help you find the rest of the information more quickly.  I was doing this over the period of a few weeks, and I wasn’t exactly taking notes.

  1.  When you first plug in a new SSD, you will have to initialize the disk. You have to have it plugged in, and access compmgmt.msc through the cmd prompt.
  2. While you are there, make note of all the details of the partitions that are currently on your main SSD.
  3. You will need another hard drive with space larger than the SSD you are upgrading from.
  4. You will need Acronis software, and a thumb drive to run it’s software from.  Use this to backup the original SSD onto the extra hard drive.
  5. You will need another thumb drive.  Use the tools that come with Windows to make a repair disk on this thumb drive.
  6. Turn off the computer, and use standard computer modding procedures (turn it off, unplug everything, ground yourself, etc) to swap out the SSDs, leaving the original disconnected.  Put everything back together.
  7. Using the Acronis software on the flash drive, and the hard drive you made the backup to, restore the image of the original SSD onto the new one using CUSTOM settings.  You will want to set the system and recovery partitions on the new SSD to the same size as the original, and expand the size of the C: drive partition to fill up the rest of the space on the drive.
  8. When you try to boot your computer afterwards, it won’t work.  You haven’t done anything wrong, the Windows OS apparently uses references not just to the pathname of the drive but references to the specific drive hardware it is running on.  You will need to shut down the computer, swap out the Acronis software drive for the Windows Repair drive, and reboot the computer.  The repair software will fix the install itself.
  9. Now that it’s working, you may still have some cleanup to do.  If you have been running games from your hard drive, you will want to move the installs.
    1. Oculus:  Thankfully, in more recent updates since when I previously tried to install the SSD, the Oculus software has added an option for being able to move installs from one location to another.  Use it to create a new game install location on the SSD and then move all your VR games over from within Oculus.  DO NOT TRY TO MOVE THE FILES MANUALLY.  It appears that Oculus software does not acknowledge files that are already within the correct folder unless Oculus moved it there in the first place.
    2. Steam: For Steam, you use the software to define a new install location, then move the files from their old location to the new one, and try to run the game.  Steam will get confused for a bit, but then track down where the current install is and run from there.

So, that’s the gist of what I did.  I know it’s lacking in the technical details, but hopefully it will be enough to help you track down the latest info on how to swap an SSD out for a larger one if you need to.  I didn’t know enough about some of these concepts when I started to realize that some of those steps were even a thing.

Less loading time, and more game time for me!

Oculus Touch Controls Wall Mount

I found this wall mount on Thingiverse a while ago, but hadn’t taken the time to print it before.  It’s mounted with command strip tape, so we’ll see how long that holds up.  There were other versions that used screws, but I prefer not to put holes in my walls when i can avoid it.

Oculus Touch Wall Mount Command Strip Version
There’s another add on option for hanging the headset on that same mount, but I don’t think I trust the single command strip to hold that much weight.  I’m still weighing my options, but I would like to have some stand or mount for it to keep it from taking up horizontal space on my desk or table when not in use.

Headset Hanger Add On

Image is from Thingiverse at the link above.

New Chair o’Gaming

My old throne was getting rather worn.. to the point that it was shedding little bits of material all the time, making my floors look dirty and making me feel like I was taking terrible care of my place.

So I finally upgraded.  I wanted arms that could flip up so my chair would fit better under my desk or to the side when I’m setting up for VR.

My hope had been that I could use the mounts I had 3D-printed for the HOTAS setup on this chair.  Sadly, they don’t fit, and I’m not going to ruin my chair by trying to force them.  I’ll have to look into alternate arrangements.  The adjustments and the arms on the chair make using the HOTAS on my desk a gain look promising, as I can slide closer without the arms interfering.

For anyone who wants to know, the chair comes from Staples.  It comes in 4 color options: blue, red, green, and gray, and they are all currently $100 off online ($70 off in store).

Staples Gaming Chair

Standard Disclaimer:  None of the post was sponsored by anyone.  I just like this chair.